Recommended by a friend,Encountered such a good article describes concurrent,I translated it for everyone to read。I am not a professional translator,Limited level。Error is inevitable,If readers find the text is wrong,Welcome messages treatise!
R0uter
Article translated appcoda iOS Concurrency: Getting Started with NSOperation and Dispatch Queues
In iOS in development,Concurrent will always be seen as something of a monster level。It is many developers as possible to avoid the danger zone。Many rumors say you should avoid as much as possible in writing multi-threaded code。I think,If you do not quite understand the words of concurrent,It is indeed very dangerous。But this is only because of the unknown and become nothing more dangerous。Man do you think about life how much dangerous behavior or action,Many, right? But once they have mastered the concurrent,Concurrent will become less scary。Concurrency is a double-edged sword that you should learn how to use。It helps you to write efficient、Fast and agile application,But at the same time,Misuse it will mercilessly destroy your application。That is why before writing concurrent code,Think about why you need to use the first and in the end the concurrency API with which to solve your problem? In iOS where we have different API available。This tutorial we will discuss the two most commonly used API - NSOperation and Dispatch Queues。
Why do we need concurrency?
I know you are an experienced iOS developers。No matter what application you want to create,In short,You will need to know about concurrent to make your applications more agile and fast。Here I summarize the benefits of learning or using several concurrent:
- IOS devices use hardware: Now all iOS devices have allowed developers to simultaneously perform multiple tasks of multi-core processors。You should take advantage of this capability and benefit from hardware。
- Better user experience: You might write code to call a web service,Some IO processing,Or perform any tasks severe。As you know,Do these tasks will be stuck in the application UI thread,Cause the application not responding。That users encountered such a situation,His first reaction must be forced to close your application。Concurrent use,All of these tasks can be done in the background without the need to suspend the main thread or disturb your users。Application in the background processing tasks at the same time heavily loaded,They still can click the button,Scroll navigation。
- Such as API and dispatch Queues allow concurrent NSOperation easier to use: Create and manage threads is not a simple task。That is why most developers afraid to encounter concurrency and multi-threaded code。In iOS where we have a very easy to use API to use without the need for complicated by so painful and crash。You do not need to be concerned about low-level tasks or threads to create managers and。API will help you to synchronize and to avoid competition issues。Competition will result in strange try to access shared resources in a multi-threaded。By using synchronous,You can protect shared resources between threads。
What you need to know about concurrency?
In this tutorial,We will explain to you everything you need to know about concurrency and its release so fear you。First, as a content concurrency API in heavy use,We recommend to see a blocks (Swift Lane closures)。Then we will discuss the dispatch queues and NSOperationQueues 。Each concept we'll take you inside the concurrent,Differences and how to achieve them。
Part 1: GCD (Global central dispatch)
GCD is to manage concurrent code and perform the most common tasks asynchronous API level in UNIX systems。GCD provide and manage the job queue。First of all,Let's see what is the queue。
What is a queue?
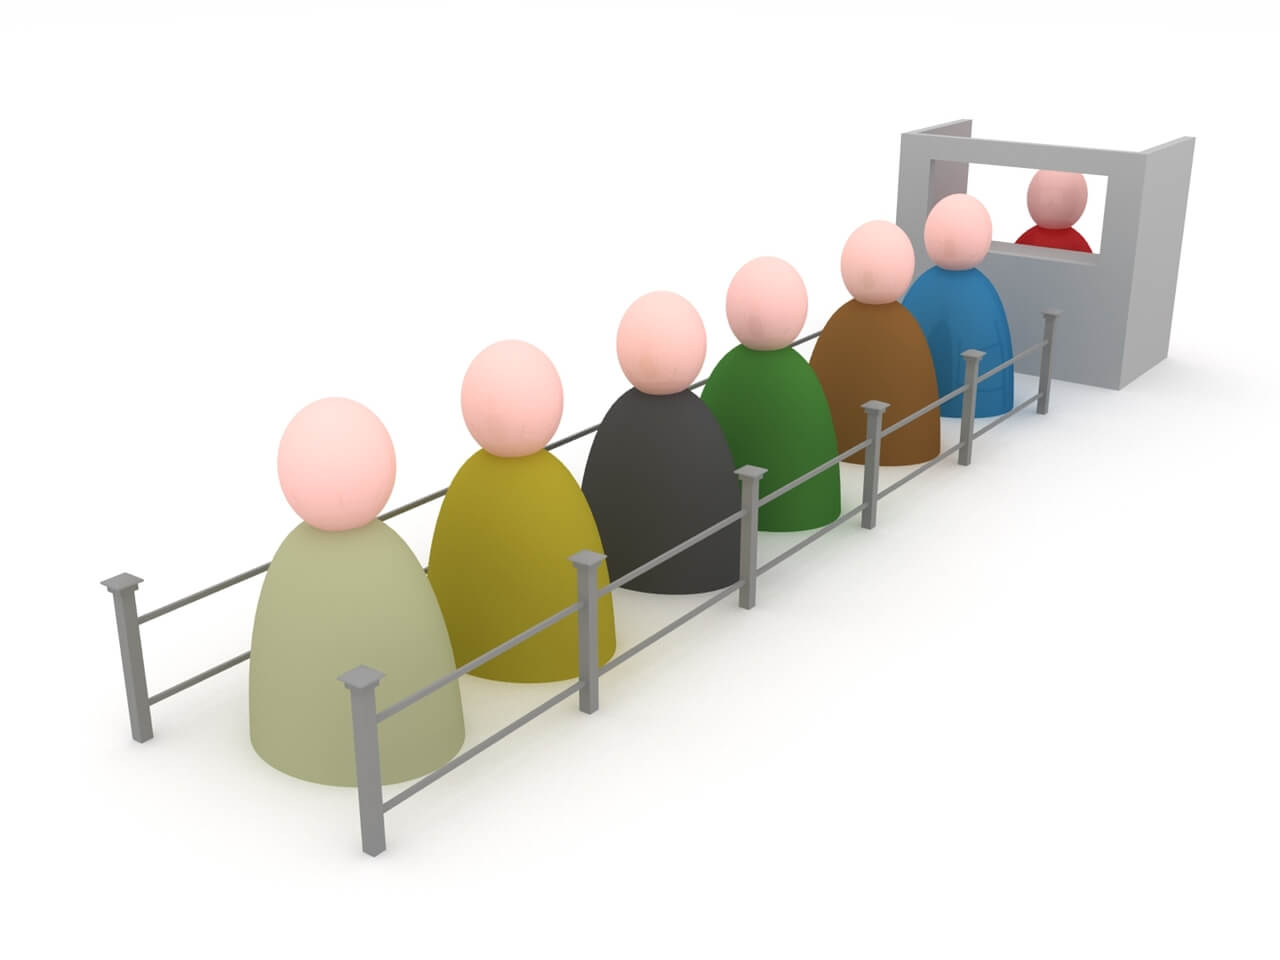
Queue data structure is a first in first out (FIFO) rules management object。Queue ticket window in the front row with team almost cinema。Tickets sold first come first served rule。Queue in front of people than the queue behind people get to buy tickets。Computer queue because almost added to the queue first object is first removed from the queue with the object。
Dispatch Queues
Scheduling queue1It is to perform asynchronous tasks and simple method in your application in concurrent。They are submitted from the task queue blocks (block) your application。There are two scheduling queue:(1) Serial queue2,&(2) parallel queue3。Before considering the different points,You need to know both assigned to the queue of tasks will be executed, respectively, in the thread instead of creating them that thread。in other words,You create a block of code in the main thread and then submit it to the scheduling sequence。But all of these tasks (code blocks) will be executed instead of the main thread in a different thread。
Annotation:
[1]Scheduling queue:dispatch queues,For non-necessary,I understand as much as possible in order to be translated into Chinese。
[2]Serial queue:serial queues
[3]Parallel queue:competitor tails
Serial queue
When you choose to create a serial queue,Queue can only execute one task。All tasks in the same serial queue will then cross-references serial execution。In short,They do not care about other queue of tasks means that you can still perform tasks concurrently by using multiple serial queue。Not so much,You can create two serial queue,Each queue time to perform a task but only two queues are still performed simultaneously。
Serial queue is used to manage shared resources is great。Continuous access to shared resources it provides protection and to avoid competition issues。Imagine just one ticket but there are a bunch of people want to buy movie tickets,Here the ticket office is a shared resource。If the employee can not provide a service to everyone here will become a mess。To deal with such a situation,It would demand line (serial queue),So that employees will be able to provide service to a customer once a。
say it again,This does not mean that cinema can only provide service to a customer。If it is established by two or more box office,Will naturally while providing service to more customers。That's why I say to you still can use multiple serial queues to perform multiple tasks simultaneously。
The benefits of using a serial queue:
- Ensures serial access to shared resources to avoid competition problems;
- Predictable task execution order。When you submit the task to the scheduling sequence,They will be performed in order of insertion;
- You can create any number of serial queue。
Parallel queue
As the name suggests,Parallel queue allows you to perform multiple tasks simultaneously。Task (code blocks) to add them to the queue start enable。But they are concurrent execution of other tasks and they will not wait for it to start。Parallel to ensure that the task queue in the same order started but you will not know the order of execution,Execution time or at a specific time to perform a number of tasks。
For example,,You submit three tasks (task # 1,#2And # 3) parallel to queue。And their task is to be executed concurrently added to the queue start。In short,Execution time and completion time is changing。Even if the task # 2 and # 3 tasks require some time to start,They are likely to be completed before the task # 1。It depends on the system to determine perform tasks。
Use queue
Now that we have explained the serial and parallel queues,It's time to look at how we want to use them。The default is,System to each application and provides a four concurrent serial queue queues。Main global dispatch queue is available serial queue,It performs tasks in your application's main thread。It is sent to update the UI and the implementation of all application-related tasks update UIView。You can only perform one task,This is why the UI will be severe task you perform in the main sequence of lock blocking。
In addition to the main queue,The system also provides four concurrent queue。We call them the global dispatch queue。These queues are applied globally and only priority is different。To use the global queue parallel,You need to function dispatch_get_global_queue Obtain Queue you prefer,It receives the following parameter value in the first form of:
- DISPATCH_QUEUE_PRIORITY_HIGH
- DISPATCH_QUEUE_PRIORITY_DEFAULT
- DISPATCH_QUEUE_PRIORITY_LOW
- DISPATCH_QUEUE_PRIORITY_BACKGROUND
These types of queues showing the priority of execution。HIGH queue has the highest priority and has the lowest priority BACKGROUND。So you can decide your task queue up to use the。Also keep in mind these queues are also using the API Apple,So your job is not the only presence of these tasks queue。
At last,You can create any number of serial or parallel queue。If the parallel queue,I highly recommend using one of the four global queue,Although you can create your own。
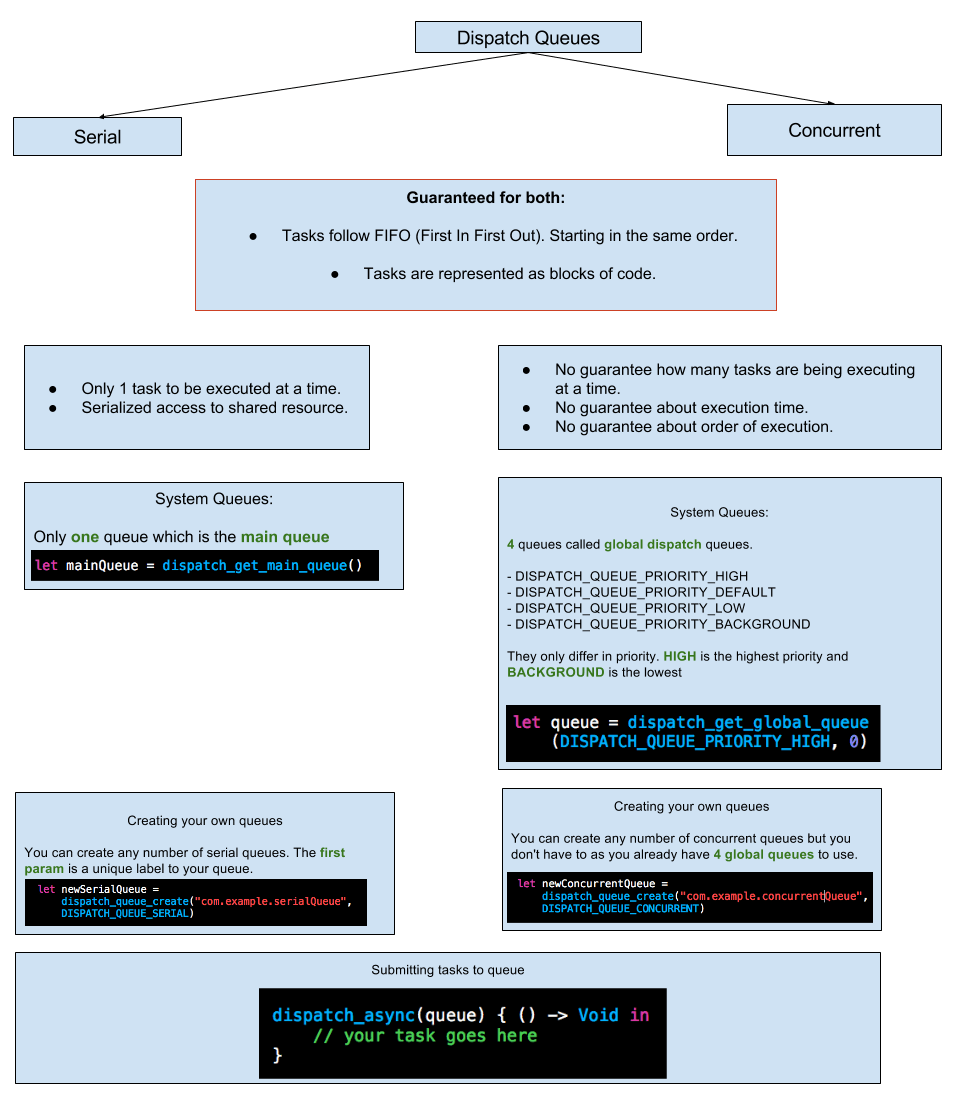
GCD Cheat Sheet
Now you should have a basic understanding of the scheduling queue。I will give you a simple cheat sheet for your reference。This is very simple cheat sheet,It contains all the information you need to know about the GCD。
Cock Cock da,Right? We put forward a simple demo to see how the scheduling queue。I will show you how to use dispatch queues to optimize application performance and make it more agile。
Demo Project
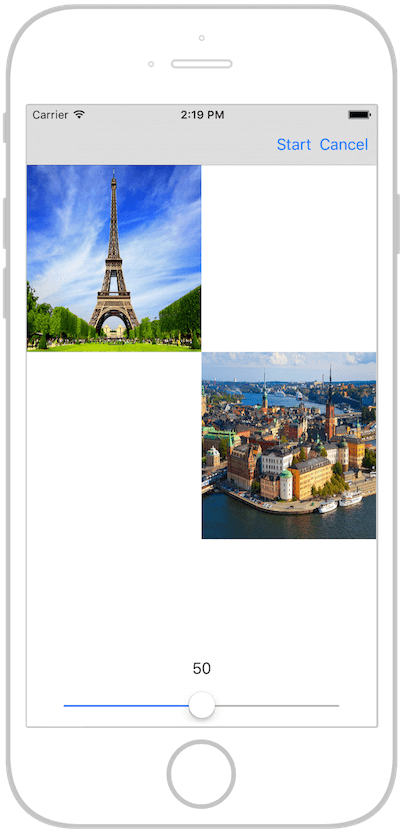
Our project is very simple novice,We view the reality of four pictures,Each will need to obtain a specific picture from a remote site。Image acquisition is completed in the main thread。To show you how this is affecting UI response,I have to add a simple slider in the picture below。NowDownload and run the novice project。Click the Start button to start downloading pictures while you drag the slider。You will find that you can not simply drag。
Once you click on the Start button,Pictures start downloading from the main thread。Obviously,This leads to very bad results make the UI unresponsive。Unfortunately we know today there are still many applications like this are still heavily loaded tasks in the main thread。Now we're going to use the scheduling queue to fix it。
First, we will achieve a solution with the parallel queue and then use a serial queue。
Using parallel dispatch queue
Now back to Xcode project ViewController.swift file。If you read the code,You will see action method didClickOnStart 。This method of processing the image to download。Now we perform this task:
|
1 2 3 4 5 6 7 8 9 10 11 12 13 14 |
@IBAction func didClickOnStart(sender: AnyObject) { let img1 = Downloader.downloadImageWithURL(imageURLs[0]) self.imageView1.image = img1 let img2 = Downloader.downloadImageWithURL(imageURLs[1]) self.imageView2.image = img2 let img3 = Downloader.downloadImageWithURL(imageURLs[2]) self.imageView3.image = img3 let img4 = Downloader.downloadImageWithURL(imageURLs[3]) self.imageView4.image = img4 } |
Each download is seen as a task,All tasks are now performed in the main queue。Now we get one of four global parallel queues,The default priority queue。
|
1 2 3 4 5 6 7 8 9 10 |
let queue = dispatch_get_global_queue(DISPATCH_QUEUE_PRIORITY_DEFAULT, 0) dispatch_async(queue) { () -> Void in let img1 = Downloader.downloadImageWithURL(imageURLs[0]) dispatch_async(dispatch_get_main_queue(), { self.imageView1.image = img1 }) } |
We first dispatch_get_global_queue Get the default queue parallel references,Then download the code block where we submitted the first task image。Once the image download is complete,We submit a job to the main queue to use the downloaded image to update the image view。in other words,We put the image download task background thread,But the implementation of the relevant update the UI in the main queue。
|
1 2 3 4 5 6 7 8 9 10 11 12 13 14 15 16 17 18 19 20 21 22 23 24 25 26 27 28 29 30 31 32 33 34 35 36 37 38 39 40 41 42 43 |
@IBAction func didClickOnStart(sender: AnyObject) { let queue = dispatch_get_global_queue(DISPATCH_QUEUE_PRIORITY_DEFAULT, 0) dispatch_async(queue) { () -> Void in let img1 = Downloader.downloadImageWithURL(imageURLs[0]) dispatch_async(dispatch_get_main_queue(), { self.imageView1.image = img1 }) } dispatch_async(queue) { () -> Void in let img2 = Downloader.downloadImageWithURL(imageURLs[1]) dispatch_async(dispatch_get_main_queue(), { self.imageView2.image = img2 }) } dispatch_async(queue) { () -> Void in let img3 = Downloader.downloadImageWithURL(imageURLs[2]) dispatch_async(dispatch_get_main_queue(), { self.imageView3.image = img3 }) } dispatch_async(queue) { () -> Void in let img4 = Downloader.downloadImageWithURL(imageURLs[3]) dispatch_async(dispatch_get_main_queue(), { self.imageView4.image = img4 }) } } |
You just submitted four images are downloaded as parallel tasks to the default queue。Now compile and run the application,It should run faster some (if you compile error,Examine the code and make sure the top of the same)。Note that while downloading,You should be able to drag the slider。
Serial dispatch queue
An alternative solution is to use a serial queue。Now,Back to ViewController.swift That same document didClickOnStart() Technique。This time we will use a serial queue to download the pictures。When using the serial queue,You need to pay attention to your height is referenced in the serial queue。Each application has a default serial queue,It is actually the main queue UI。So Remember that when using the serial queue,You must create a new queue,Otherwise, you will carry out your mission in the application used to update the UI。This can lead to errors and delays damage the user experience。you can use dispatch_queue_create Function to create a new queue, and then we do the same before it's put up job submission。After modifying,The code looks like this:
|
1 2 3 4 5 6 7 8 9 10 11 12 13 14 15 16 17 18 19 20 21 22 23 24 25 26 27 28 29 30 31 32 33 34 35 36 37 38 39 40 41 42 43 44 45 |
@IBAction func didClickOnStart(sender: AnyObject) { let serialQueue = dispatch_queue_create("com.appcoda.imagesQueue", DISPATCH_QUEUE_SERIAL) dispatch_async(serialQueue) { () -> Void in let img1 = Downloader .downloadImageWithURL(imageURLs[0]) dispatch_async(dispatch_get_main_queue(), { self.imageView1.image = img1 }) } dispatch_async(serialQueue) { () -> Void in let img2 = Downloader.downloadImageWithURL(imageURLs[1]) dispatch_async(dispatch_get_main_queue(), { self.imageView2.image = img2 }) } dispatch_async(serialQueue) { () -> Void in let img3 = Downloader.downloadImageWithURL(imageURLs[2]) dispatch_async(dispatch_get_main_queue(), { self.imageView3.image = img3 }) } dispatch_async(serialQueue) { () -> Void in let img4 = Downloader.downloadImageWithURL(imageURLs[3]) dispatch_async(dispatch_get_main_queue(), { self.imageView4.image = img4 }) } } |
As we have seen, the only difference is that the parallel queue creating a serial queue。When you compile and run the application again,You will see the image again to download in the background,So you can continue to interact with the UI。
- Compared with the case of parallel queues,It takes a little time to download images。The reason is that we once only download a picture。Each task will wait for the completion of the task in front began to perform。
- Image image1, image2, image3, And loading order image4。This is because the queue is a queue every time it performs a serial task。
Part 2: Operation Queues
GCD is a low-level C API,It enables developers to perform tasks concurrently。Operation Queue4,on the other hand,It is a high-level abstraction of the queue mode,And it is based on the GCD。This means that you can concurrently perform tasks like GCD,It is an object-oriented style。Simply put,Operating queues allow developers to some of Gengshuang。
Different from the GCD,They do not comply with the principle of first in first out。This operation is different from the scheduling queue of the queue:
- Failure to comply FIFO:In operation queue,You can set up the operation priority to the operator also may be added between operations rely That means you can define certain operations will only be executed after another operation is completed。This is why they do not follow the first-in-first-out;
- The default is,They are executed concurrently:You can not change its type to the serial queue,But you still have a workaround to perform a sequence of operations in the operation queue,That is the use of dependence between the operating;
- Operation queue is NSOperationQueue Instance of the class,Its mission is encapsulated in NSOperation In the instance of the class。
NSOperation
The task is to submit to the operation queue NSOperation Examples of forms submitted。We discussed in the GCD,Job submission in the form of block。Here it is the same but should be tied to NSOperation Examples of inside。You can simply put NSOperation Imagine the work of the unit。
NSOperation It is an abstract class that can not be used directly,So you have to use NSOperation Subclass。In the iOS SDK,We have two specific NSOperation Subclass。These classes can be used directly,But you can also subclass NSOperation Then create your own class to perform tasks。The two classes that we can directly use:
- NSBlockOperation - use this class to the one or more code blocks with an initialization operation。Operation itself can contain more than one code block,When finished all code blocks,Even if the operation is ended;
- NSInvocationOperation - use this class to call a particular object in the initialization selector Operations
Where is the NSOperation advantage?
1)First of all,They support the NSOperation By class method addDependency(on: NSOperation) To set up relies。When you need to start to rely on other operations operations,You may have to use NSOperation ;
2) Second,You can set the priority queuePriority The following values to change the execution priority:
|
1 2 3 4 5 6 7 |
public enum NSOperationQueuePriority : Int { case VeryLow case Low case Normal case High case VeryHigh } |
A high-priority operation is executed first。
3) You can cancel a particular operation or all the operations of a given queue。After adding the operation queue can be canceled。Cancel by calling NSOperation Class of cancel() Way to do。When you cancel any operation,One of the following three will happen:
- Your operation has been finished。In that case,Cancel method also invalid;
- Your operation has been in execution。In that case,The system does not force you to stop the operation code,But set cancelled Property true ;
- Your operations are still in the queue waiting to be executed。In that case,Your operation will not be executed。
4) NSOperation There are three useful Boolean property,They are finished , cancelled , and ready 。 finished Will be set when the operation is finished true 。 cancelled It will be set when the operation has been canceled true 。 ready Will be set when the operation to be executed true 。
5)any NSOperation You have an option to set a complete block,Once the task is completed will be called。 NSOperation of finished Once the property is set to true ,Code block will be called。
Now let us re our demo project,This time we will use NSOperationQueues 。First, ViewController Class to make the following statement:
|
1 |
var queue = NSOperationQueue() |
Then,Replaced with the following code didClickOnStart Technique,Then take a look at how we NSOperationQueue In performing operations:
|
1 2 3 4 5 6 7 8 9 10 11 12 13 14 15 16 17 18 19 20 21 22 23 24 25 26 27 28 29 30 31 32 33 34 35 36 37 38 39 |
@IBAction func didClickOnStart(sender: AnyObject) { queue = NSOperationQueue() queue.addOperationWithBlock { () -> Void in let img1 = Downloader.downloadImageWithURL(imageURLs[0]) NSOperationQueue.mainQueue().addOperationWithBlock({ self.imageView1.image = img1 }) } queue.addOperationWithBlock { () -> Void in let img2 = Downloader.downloadImageWithURL(imageURLs[1]) NSOperationQueue.mainQueue().addOperationWithBlock({ self.imageView2.image = img2 }) } queue.addOperationWithBlock { () -> Void in let img3 = Downloader.downloadImageWithURL(imageURLs[2]) NSOperationQueue.mainQueue().addOperationWithBlock({ self.imageView3.image = img3 }) } queue.addOperationWithBlock { () -> Void in let img4 = Downloader.downloadImageWithURL(imageURLs[3]) NSOperationQueue.mainQueue().addOperationWithBlock({ self.imageView4.image = img4 }) } } |
As you can see,milk addOperationWithBlock TechniqueTo create a new operation with a given closure。It's simple is not it? To perform tasks in the main queue rather than like when we use the GCD dispatch_async() We can NSOperationQueue Where do the same thing ( NSOperationQueue.mainQueue() ) Then submit the operation you want to perform in the main queue。
|
1 2 3 4 5 6 7 8 9 10 11 12 13 14 15 16 17 18 19 20 21 22 23 24 25 26 27 28 29 30 31 32 33 34 35 36 37 38 39 40 41 42 43 44 45 46 47 48 49 50 51 52 |
@IBAction func didClickOnStart(sender: AnyObject) { queue = NSOperationQueue() let operation1 = NSBlockOperation(block: { let img1 = Downloader.downloadImageWithURL(imageURLs[0]) NSOperationQueue.mainQueue().addOperationWithBlock({ self.imageView1.image = img1 }) }) operation1.completionBlock = { print("Operation 1 completed") } queue.addOperation(operation1) let operation2 = NSBlockOperation(block: { let img2 = Downloader.downloadImageWithURL(imageURLs[1]) NSOperationQueue.mainQueue().addOperationWithBlock({ self.imageView2.image = img2 }) }) operation2.completionBlock = { print("Operation 2 completed") } queue.addOperation(operation2) let operation3 = NSBlockOperation(block: { let img3 = Downloader.downloadImageWithURL(imageURLs[2]) NSOperationQueue.mainQueue().addOperationWithBlock({ self.imageView3.image = img3 }) }) operation3.completionBlock = { print("Operation 3 completed") } queue.addOperation(operation3) let operation4 = NSBlockOperation(block: { let img4 = Downloader.downloadImageWithURL(imageURLs[3]) NSOperationQueue.mainQueue().addOperationWithBlock({ self.imageView4.image = img4 }) }) operation4.completionBlock = { print("Operation 4 completed") } queue.addOperation(operation4) } |
We create a new to each operator NSBlockOperation Examples of tasks to be packaged closure。by using NSBlockOperation ,You can set the processor to complete。When the operation is now over,The processor will be called to complete。simply speaking,We just recorded a simple message to clear the operation has been completed。If you run this demo,You will see the following output in the terminal:
|
1 2 3 4 |
Operation 1 completed Operation 3 completed Operation 2 completed Operation 4 completed |
Cancellation
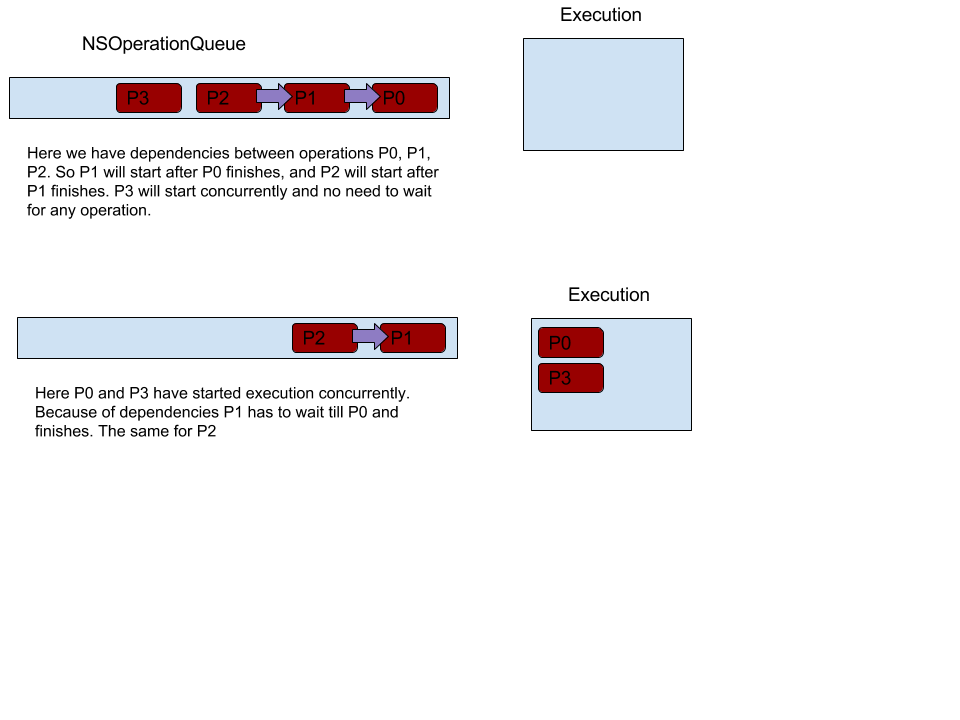
As mentioned on top, NSBlockOperation It allows you to manage the operation。Now let's look at how to cancel the operation。To do,Start by adding a bar button item The navigation bar and then named it Cancel 。To cancel the demo,We will add a dependency between the operation and the operating # 1 # 2,And further adding a dependency between the operations and operation # 2 # 3。This means that the operating # 3 will be executed after the operation is completed # 1,# 3 operation will be performed after the completion of the operation # 2。Operation # 4 did not depend on it will execute concurrently。To cancel the operation you need to do is call NSOperationQueue of cancelAllOperations() Technique。exist ViewController Insert a method class:
|
1 2 3 4 |
@IBAction func didClickOnCancel(sender: AnyObject) { self.queue.cancelAllOperations() } |
Do you live you need to add to your Cancel Button linked to didClickOnCancel Technique。You can return to Main.storyboard File Open Connection Manager。There you will see the unconnected Received Actions in didSelectCancel() 。Click + Drag from the circle to hollow Cancel Button。Then didClickOnStart Creating dependencies in the following method:
|
1 2 |
operation2.addDependency(operation1) operation3.addDependency(operation2) |
Next, changing operation is completed closure # 1 to record cancelled status:
|
1 2 3 |
operation1.completionBlock = { print("Operation 1 completed, cancelled:\(operation1.cancelled) ") } |
You may need to operate # 2,#3# 4 and change log text,This way you will have a better understanding of the process。Now let's compile and run。You click on Start Button,Click Cancel Push button。This will cancel all operations after the completion of the operation # 1。Here are things to happen:
- The operation has been carried out for # 1,Cancellation will not help。That's why cancelled Value is recorded as false ,So the application still shows the image # 1;
- If you point Cancel Button fast enough,Operation # 2 will be canceled。 cancelAllOperations() The call will stop its execution,So do not download the image # 2;
- Operation # 3 is already in the queue,Wait for the operation to complete the # 2。It depends, however Operation # 2 # 3 is completed is removed,Operation # 3 and will not be performed immediately kicked queue;
- For operation # 4 is,Without any dependence。So it concurrent execution downloaded # 4。
How deep?
In this tutorial,I take you on a theory iOS concurrency and how to implement it in iOS。I made a good introduction to concurrency for you,He explains the GCD,And show you how to create serial and parallel queues。Other than that,We also learned NSOperationQueues 。You should now clear that global central dispatch and NSOperationQueue difference between。
To learn more about iOS concurrent,I suggest you readApple concurrent Guide。
If the reference words,You can iOS Concurrency repository on Github Find the full source code we mention here。
Article translated appcoda iOS Concurrency: Getting Started with NSOperation and Dispatch Queues
Original article written by LogStudio:R0uter's Blog » iOS Concurrency:Getting NSOperation and Dispatch Queues
Reproduced Please keep the source and description link:https://www.logcg.com/archives/1436.html


