更新:升级 Ubuntu 20.04 LTS 后,csf 无法正常工作了,提示找不到 iptables:
|
1 |
Testing ip_tables/iptable_filter...open3: exec of /sbin/iptables -I OUTPUT -p tcp --dport 9999 -j ACCEPT failed: No such file or directory at /usr/local/csf/bin/csftest.pl line 144. |
这是由于 Ubuntu 20.04 LTS 更改了 iptables 相关命令位置导致的,csf 的脚本并没有及时更新。
|
1 |
/sbin/iptables → /usr/sbin/iptables |
要解决这个问题,我们可以到 /etc/csf/csf.conf 配置文件,在这个文件靠近末尾的位置,有一个 # Binary locations 相关设定,这里我们可以看到前6个配置地址还是旧的:
|
1 2 3 4 5 6 7 8 |
# Binary locations IPTABLES = "/sbin/iptables" IPTABLES_SAVE = "/sbin/iptables-save" IPTABLES_RESTORE = "/sbin/iptables-restore" IP6TABLES = "/sbin/ip6tables" IP6TABLES_SAVE = "/sbin/ip6tables-save" IP6TABLES_RESTORE = "/sbin/ip6tables-restore" …… |
更改为新地址:
|
1 2 3 4 5 6 7 |
# Binary locations IPTABLES = "/usr/sbin/iptables" IPTABLES_SAVE = "/usr/sbin/iptables-save" IPTABLES_RESTORE = "/usr/sbin/iptables-restore" IP6TABLES = "/usr/sbin/ip6tables" IP6TABLES_SAVE = "/usr/sbin/ip6tables-save" IP6TABLES_RESTORE = "/usr/sbin/ip6tables-restore" |
这样, csf -r 就可以正常生成配置了,不过,缺点是 perl /usr/local/csf/bin/csftest.pl 依旧是会报错的,但现在 csf 本身已经成功启动了。
之前我写过一篇文章,购买了VPS之后你应该做足的安全措施,这里边介绍了如何安装 csf 防火墙,其实很简单就几条命令,不过,由于当时我的无知,导致实际上csf 防火墙并没有真正生效,原因是 csf 和 ufw 一样都是 iptables 脚本,它们处在同一层级,是互相冲突的。
所以,在配置 csf 防火墙时,你应该先执行命令 ufw disable 来关闭 ufw。
然后,我们安装 csf 防火墙:
|
1 2 3 4 |
wget https://download.configserver.com/csf.tgz tar -zxvf csf.tgz cd csf sh install.sh |
安装完成后,安装需要的环境:
|
1 |
apt install libwww-perl perl sendmail |
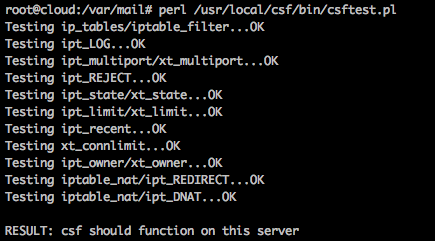
ok之后,执行命令来检查防火墙的状态: perl /usr/local/csf/bin/csftest.pl ,如果输出如下,那么防火墙的执行应该就没什么问题了:
首先我们要做最基本的配置,来配置 csf 的放行端口,千万记得不能把 22 端口给断了,不然你就再见吧。
当然,csf 一旦安装好,是默认放行常见端口的,所以,我们做的只是去掉不用的。另外,csf 默认工作在测试模式,这样的话如果你真把自己关在外面了,没关系,五分钟后规则会清空的。
下面我们来编辑 vi /etc/csf/csf.conf :
默认情况下,放行的端口如下:
|
1 2 3 4 5 6 7 |
TCP_IN = "20,21,22,25,53,80,110,143,443,465,587,993,995" TCP_OUT = "20,21,22,25,53,80,110,113,443" UDP_IN = "20,21,53" UDP_OUT = "20,21,53,113,123" |
这里我根据我的需要,做了精简:
|
1 2 3 4 5 6 7 8 9 10 11 12 |
# Allow incoming TCP ports TCP_IN = "22,80,143,53,443" # Allow outgoing TCP ports TCP_OUT = "22,25,53,80,110,113,443,587,993,995" # Allow incoming UDP ports UDP_IN = "53" # Allow outgoing UDP ports # To allow outgoing traceroute add 33434:33523 to this list UDP_OUT = "53,113,123,33434:33523" |
当然,我的服务器还支持 IPv6,所以需要继续往下翻,找到 IPv6 的配置,再来一遍:
|
1 2 3 4 5 6 7 8 9 10 11 12 |
# Allow incoming IPv6 TCP ports TCP6_IN = "22,80,143,53,443" # Allow outgoing IPv6 TCP ports TCP6_OUT = "22,25,53,80,110,113,443,587,993,995" # Allow incoming IPv6 UDP ports UDP6_IN = "53" # Allow outgoing IPv6 UDP ports # To allow outgoing traceroute add 33434:33523 to this list UDP6_OUT = "53,113,123,33434:33523" |
然后是添加防御规则,阻止日常少量的 ddos,当然,量大了的话还得靠硬件了对吧?
找到字段 PORTFLOOD ,做如下规则:
|
1 |
PORTFLOOD = "22;tcp;5;300,80;tcp;20;5,443;tcp;20;5" |
这里规则是说分别对端口 22,80,443做策略(以IP为单位):
- 如果 22 端口某 IP 在 300 秒内发起 5 个以上链接,就 ban;
- 如果 80 或 443 端口某 IP 在 5 秒内发起 20 个以上链接,就 ban。
ban 的时间默认是 1800 秒。
然后,csf 还有个功能是在 ban 了 IP 之后发邮件通知你,我们对如下字段做修改,加入自己的邮件地址:
|
1 |
LF_ALERT_TO = "your-email@gmail.com" |
由于 lfd 还会发送可疑进程监控,如果你觉得烦,可以提前把你的进程加入白名单,编辑 /etc/csf/csf.pignore ,按照格式在末尾补充就可以了,比如我服务器跑了 nginx,php,我知道这不是可疑进程,那么就这样写:
|
1 2 |
exe:/usr/sbin/nginx exe:/usr/sbin/php-fpm7.0 |
这样,我们的防火墙就配置好了,保存好配置后就可以尝试重启一波:
记得先用检测命令查看配置是否正确: perl /usr/local/csf/bin/csftest.pl
然后使用命令 csf -r 来重启防火墙,如果没什么致命问题,那说明防火墙正常工作了。至于这句:
|
1 |
*WARNING* RESTRICT_SYSLOG is disabled. See SECURITY WARNING in /etc/csf/csf.conf. |
就让他 disabled 即可。
还有一个问题你可能会遇到,就是提示你 lfd 启动但崩溃了,这是正常的,在测试模式, lfd 不启动。
重新编辑 /etc/csf/csf.conf 配置文件,在第一行,把 1 改为 0:
|
1 |
TESTING = "0" |
保存后重启防火墙 csf -r 这时候防火墙就已经正常运行了。
使用命令启动 csf 和附带的 lfd:
|
1 2 |
service csf start service lfd start |
通过查看 /var/log/lfd.log 可以看到 csf 防火墙的所有行为,比如 ban 了哪个 IP 之类的。
如果要添加白名单,那么就编辑 /etc/csf/csf.allow ,ip地址一行一个;
如果要手动添加黑名单,那么就编辑 /etc/csf/csf.deny ,也是一行一个,不过,这里边也会有规则自动添加的数据;
另外,你也可以添加忽略列表,列表中的 IP 地址不会被规则判断,但如果在黑名单中也存在,就会被阻止: /etc/csf/csf.ignore
这样,你的服务器应该就更坚固了 :)
额外
另外说一下,如果你嫌邮件通知烦,可以在 csf.conf 中搜索所有 _EMAIL_ALERT 结尾的字段,将值从 "1" 改为 "0" ,有好几个,记得善用搜索。
参考文献
How To Install and Configure Config Server Firewall (CSF) on Ubuntu
linux csf 防火墙 防止少量的ddos cc攻击很有效
How to disable send an email: lfd on server: Suspicious process running under user
本文由 落格博客 原创撰写:落格博客 » 使用 csf 防火墙来有效阻止小规模 DDOS
转载请保留出处和原文链接:https://www.logcg.com/archives/2873.html

lfd.service – ConfigServer Firewall & Security – lfd
Loaded: loaded (/usr/lib/systemd/system/lfd.service; enabled; vendor preset: enabled)
Active: active (running) since Fri 2018-02-02 22:15:11 CST; 4s ago
Process: 28943 ExecStart=/usr/sbin/lfd (code=exited, status=0/SUCCESS)
Main PID: 28951 (lfd – sleeping)
Tasks: 1 (limit: 4915)
CGroup: /system.slice/lfd.service
└─28951 lfd – sleeping
Feb 02 22:15:10 VPS systemd[1]: Stopping ConfigServer Firewall & Security – lfd…
Feb 02 22:15:10 VPS systemd[1]: lfd.service: Main process exited, code=killed, status=9/KILL
Feb 02 22:15:10 VPS systemd[1]: Stopped ConfigServer Firewall & Security – lfd.
Feb 02 22:15:10 VPS systemd[1]: lfd.service: Unit entered failed state.
Feb 02 22:15:10 VPS systemd[1]: lfd.service: Failed with result ‘signal’.
Feb 02 22:15:10 VPS systemd[1]: Starting ConfigServer Firewall & Security – lfd…
Feb 02 22:15:11 VPS systemd[1]: Started ConfigServer Firewall & Security – lfd.
请帮忙看看这是什么问题啊,怎么解决,谢谢!
我以为你被DDoS了/(ㄒoㄒ)/~~
是被 ddos 了,重启了一波好了。可能是我现在服务器性能有点不够,所以稍微一打就掉了。