优秀的输入法,来到了另一个优秀的平台!
虽然它还欠缺很多功能,但我还是迫不及待地分享这美好的东西给你们,落格输入法终于走上了 macOS,多年以来,在 macOS 上输入双拼是一个噩梦,现在,这个噩梦可以终结了。
除了残缺弃坑不知道什么时候就不能用了的手心输入法 Mac 版、基本上非专业人员不能配的 Rime 输入法外,你又多了一个选择,落格输入法 macOS 版。
前前后后半年的时[……]
优秀的输入法,来到了另一个优秀的平台!
虽然它还欠缺很多功能,但我还是迫不及待地分享这美好的东西给你们,落格输入法终于走上了 macOS,多年以来,在 macOS 上输入双拼是一个噩梦,现在,这个噩梦可以终结了。
除了残缺弃坑不知道什么时候就不能用了的手心输入法 Mac 版、基本上非专业人员不能配的 Rime 输入法外,你又多了一个选择,落格输入法 macOS 版。
前前后后半年的时[……]
前段时间我说过我攒了一台高配的黑苹果,当时用的是一台普通的 1080p 显示器,我的 21:9 给同事用去了。
现在,我还是受不了这个16:9,于是我和他换了下,我又用回了我的 21:9,结果没想到……尼玛竟然不支持!
听说是 hd530 核显驱动不太行导致识别不了……
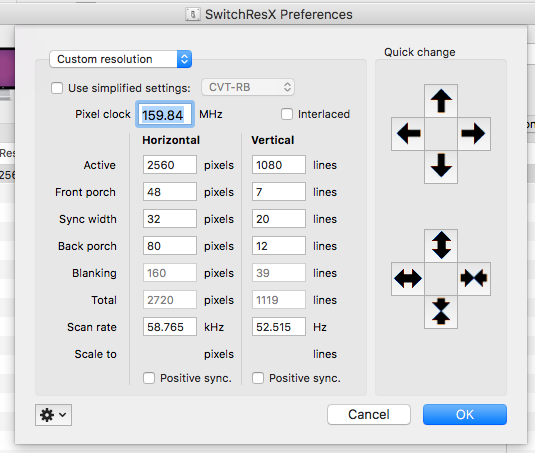
总之,咱还是有办法搞定的,经历了大半夜的奋斗,得到结果,首先是启动画面,如下图所示,把 Screen Reso[……]
RIP
这里记录一下我是如何做到让博客一下子变成黑白的,去逐个的修改主题和替换图片元素肯定是个要命的办法,我用的当然是全局的css风格文件了,利用css本身的功能即可实现黑白灰度渲染。
在 Wordpress 主题内置的额外css中加入如下代码保存即可生效,如果你是静态网站,那么就把这句加到你网站风格的最开头即可。
|
1 2 3 4 5 6 7 8 9 10 |
html { filter: grayscale(100%); -webkit-filter: grayscale(100%); -moz-filter: grayscale(100%); -ms-filter: grayscale(100%); -o-filter: grayscale(100%); filter: url(desaturate.svg#grayscale); filter:progid:DXImageTransform.Microsoft.BasicImage(grayscale=1); -webkit-filter: grayscale(1); } |
[……]
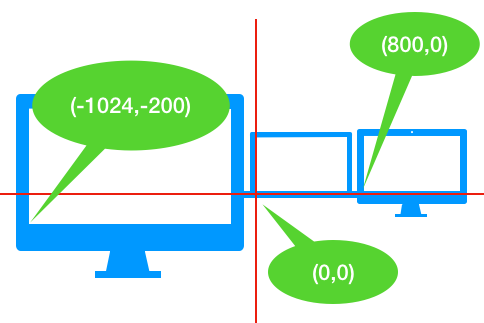
在开发落格输入法的时候,我遇到了这么一件事情,就是作为候选栏的窗口会在屏幕边缘的时候超出屏幕去!所以,在显示窗口的时候我根据坐标做了额外的检查:
|
1 2 3 4 5 6 7 8 9 10 11 12 13 14 15 16 17 |
if visiableCandidateCells.isEmpty { if let screenframe = NSScreen.main?.visibleFrame { if screenframe.width < location.x + size.width { location.x -= location.x + size.width - screenframe.width } } } else { if let screenframe = NSScreen.main?.visibleFrame { if screenframe.width < location.x + self.window!.frame.size.width { location.x -= location.x + self.window!.frame.size.width - screenframe.width } } } if location.y < 50 { location.y += 35 + 35 } |
总之,就是说如果坐标算上自己的宽度超过了屏幕的宽度,就把它挪回来。
但是,这样处理不能在多显示器下工作良好,这时由于多显示器坐标导致的:
[……]
在写落格输入法 Mac 版的过程当中,我遇到了这么一个问题,系统的候选条 API 年久失修,很多功能 API 存在但根本无效,比如:
|
1 2 3 4 5 6 7 8 9 10 11 12 13 14 15 |
/*! @method @abstract Sets the "style" attributes for the candidates window. The keys for the attributes dictionary and the values are: NSFontAttributeName (value = NSFont) Setting the font attribute sets the font that is used to draw Candidates. It does not effect the selection keys which are always drawn in the same font. Note that to set the font size you should use this key/value pair. IMKCandidatesOpacityAttributeName (value = NSNumber with a float value between 0 and 1). Sets the opacity level to transparent (0.0) to completely opaque (1.0). The default opacity is 1.0. This constant is declared above. NSForegroundColorAttributeName (value = NSColor) Sets the text color used for the candidate text. By default it is black. NSBackgroundColorDocumentAttribute (value = NSColor). Set the background color that is drawn behind the candidate text. IMKCandidatesSendServerKeyEventFirst (value = NSNumber). NO (default) gives the candidate window first chance at key events. YES causes events to first be routed to the current IMKInputController. In that case, if the event is not handled, it will then be sent to the candidate window. */ open func setAttributes(_ attributes: [AnyHashable : Any]!) |
这个方法是用来设置候选条风格的,里边除了默认的 IMKCandidatesSendServerKeyEventFirst 这个能生效外,其他的一概无视。
这就尴尬了,现在平明动辄高分4k要么就视网[……]
在 Swift 中,大家经常会用 URL 来初始化一个路径,比如网页的链接。比如这样:
|
1 2 3 4 5 6 |
…… @IBAction func goToWeb(_ sender: NSButton) { let url = URL(string: "https://v2mm.tech/category/80/logcg-input-method") NSWorkspace.shared.open(url!) } …… |
当用户点击按钮(比如说这个帮助按钮),那么一下子就帮用户打开默认的浏览器,并打开指定的页面(这里是个论坛)。
那么,如果你的链接是这样的: "https://v2mm.tech/topic/618/怎样优雅地使用落格输入法的点划功能" 那么很不幸,崩溃。
崩[……]
Gradle 默认直连网络,即使 Mac 设置了全局代理也是一样。就算你给 Android Studio 设置了代理,它依旧会风轻云淡地直连那个你在中国一辈子也不可能连上的网站……
要让 Gradle 走代理,你需要给它进行单独的配置,在每个项目的
gradle-wrapper.properties 中插入如下配置语句,记住 https 千万不能省!
[crayon-68[……]
做 app 做网站,难免要和服务器、后台、数据打交道,那么作为一名后台开发,当涉及到注册登录,你最应当想到的应该是用户的安全,尤其是密码安全。
现在安全界几乎天天都有某网站、某公司被脱裤,也就是整站的数据库被偷走被下载。那么你的用户数据全部落入了歹徒手中,应该怎么防范即使如此,歹徒也不能拿到用户的真实密码呢?
这里我们定义,“不能拿到”指的是在“有生之年”他得不到,理论上如果有足够的时间([……]